Methods
Introduction
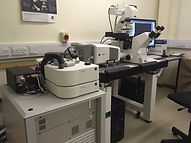
In order to generate the 3D models, we have been using a confocal laser scanning microscope (CLSM). This follows methods which were pioneered by Dr Kat Holt and colleagues at Massey University (NZ). A detailed description of the general principles behind these methods, as well as the specific ways they've been applied in the project to date, can be found in an open-access paper called The 3D Pollen Project: An open repository of three-dimensional data for outreach, education and research (published in 2023, in Review of Palaeobotany and Palynology). You can also find a general overview, and other helpful references, below. Please get in touch if you'd like to discuss the methods in more detail.

Overview
-
Obtain some (ideally acetolysed) pollen – this could be prepared specifically from fresh or preserved plant material, or could be part of an existing pollen reference collection. Acetolysis is a (fairly dangerous) chemical process which destroys pollen grains' cell contents, making them easier to scan (Vitha et al., 2009). It's not impossible to scan non-acetolysed pollen (Perry et al., 2017), though it's less ideal from an imaging perspective – the cell contents absorb light, so lower parts of the sample are less clearly imaged.
-
Mount your pollen on a slide in a medium whose refractive index (RI) matches that of the immersion medium of the objective lens on the CLSM you're going to use. RI mismatch between mountant and immersion medium causes spherical aberrations (spheres become lemon-shaped), pronounced loss of signal intensity with depth, and reduced resolution along the z-/depth axis (Staudt et al., 2007; Diel, Lichtman & Richardson, 2020; Wilson, 2023). Pollen seems to be particularly sensitive to mismatches – potentially because the samples are quite deep, and/or because aberrations are very obvious in essentially spherical grains, and/or because pollen shells absorb a lot of light (Vitha et al., 2009).
-
You could reduce RI mismatch by using a mountant whose RI is very close to that of immersion oil (~1.52), since high magnification/numerical aperture/resolution oil-immersion objectives are the most common on CLSMs. 2,2'-TDE is an example of a mountant whose RI can match that of immersion oil (Vitha et al., 2009, Staudt et al., 2007), but there are others.
-
You could also choose a CLSM objective lens which is designed to work with the same immersion medium as your mountant. This would drastically cut down sample preparation time, but while high-magnification silicone-, glycerol- and water-immersion objectives all exist, they are much less common than oil-immersion lenses.
-
-
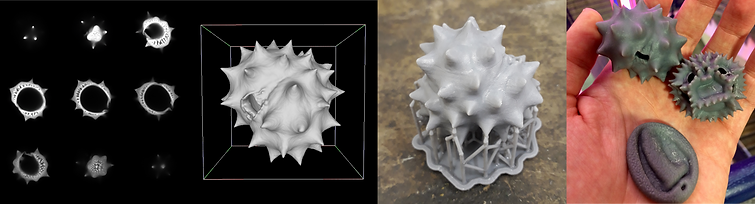
Scan your pollen with a CLSM – take a z-stack (a series of images through the grain's depth). At this point, pollen isn't too difficult to image. It's not sensitive to high laser intensities, for example (though these will bleach the grains), and it autofluoresces (shines when excited by a laser) at most wavelengths without needing to be stained. It can suffer from moderate to severe signal loss with depth; mitigate this with RI matching where possible, then increase laser power with depth and/or increase lower slices' image contrast in post-processing as needed. Example settings for CLSM pollen scanning can be found in Vitha et al. (2009), Holt & Savoian (2017), Perry et al. (2017), and Wilson (2023), though there's generally nothing especially magical about any of the specific ones they chose. It's probably best to work with a microscopist to refine the settings you use.
-
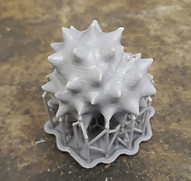
Convert your image stack to a surface mesh. You can do this in a variety of software packages, from freeware like Fiji/ImageJ's 3D viewer to proprietary programs. The specifics of how you do this will depend on what you use, but in general it will either involve using a signal intensity threshold to convert the images into a binary of solid or void, or it will involve teaching the computer to distinguish the two in an image classifier. Aim to get the model's top and bottom (parts of the sample which were close to and far from the objective lens) to look as similar as possible. You can edit the mesh as needed – to reduce file size or complexity, or to make it more suitable for 3D-printing – in software like MeshLab. Some guidelines for how to do this are in Wilson (2023).
-
Print your models. 3D-printing is very variable, so it's hard to give general advice on this – what you'll need to do will depend on your purposes, budget, and many other factors. It's well worth talking to someone with 3D-printing experience to work out how to proceed, but there's also some general guidance on our FAQ page.
-
Enjoy! In our experience, there's absolutely nothing quite like a 3D-printed model for sparking conversations about pollen. We've put together some ideas for outreach activities, but really the sky's the limit. If you find yourself using 3D pollen models – ours or yours – please let us know! You can drop us an email or tag us in a tweet (@3Dpollenproject, #3Dpollen). It's always great to see what people do with these resources!
Useful references
-
Wilson, O.J. (2023) The 3D Pollen Project: An open repository of three-dimensional data for outreach, education and research. Review of Palaeobotany and Palynology, 312, 104860. https://doi.org/10.1016/j.revpalbo.2023.104860
-
This is my paper summarising the 3D Pollen Project up to the end of 2022. It includes extended descriptions of the methods used – both the specific ones I employed and general principles that could be more easily adapted to other settings – as well as some details of key considerations for successful imaging. There's particular detail on the importance of refractive index matching. It's also open-access, so should be readily available to all.
-
-
Vitha, S. et al (2009) 3D Confocal Imaging of Pollen. Microscopy and Microanalysis, 15 (S2), p.622-3. https://doi.org/10.1017/S1431927609094367 (extended abstract) or https://www.researchgate.net/publication/231934255_3D_Confocal_Imaging_of_Pollen (full article)
-
This short paper describes how to prepare pollen using the specialist confocal microscopy mounting medium 2,2'-TDE, suggests microscope settings, and explains image processing. It is the methodological basis for Holt & Savoian (2017, below).
-
-
Holt, K.A., Savoian, M.S. (2017) Epi-fluorescence microscopy and 3D printing: An easily implemented approach for producing accurate physical models of micro- and macroscopic biological samples. In: Méndez-Vilas, A. (ed.) Microscopy and imaging science: practical approaches to applied research and education. Formatex Research Centre, Badajoz, Spain, p.697-702. ISBN: 978-84-942134-9-6 https://www.researchgate.net/publication/365367764_Epi-fluorescence_microscopy_and_3D_printing_An_easily_implemented_approach_for_producing_accurate_physical_models_of_micro-and_macro-_scopic_biological_samples
-
This book chapter describes the pollen preparation techniques (using 2,2'-TDE) and image post-processing, as well as the considerations in moving from confocal microscopy z-stacks to 3D-printed models.
-
-
Perry, I., et al. (2017) Production of 3D Printed Scale Models from Microscope Volume Datasets for use in STEM Education. EMS Engineering Science Journal, 1(1):002. https://orca-mwe.cf.ac.uk/104773/1/EMS%20Eng%20Sci%20j%202%202017.pdf
-
This paper sets out an alternative method for producing 3D-printed models of pollen. As with Holt & Savoian (2017) it discusses practicalities of imaging and printing, but these methods involve much less sample processing than the former.
-
-
Staudt, T., et al. (2007) 2,2′-Thiodiethanol: A new water soluble mounting medium for high resolution optical microscopy. Microscopy Research and Technique, 70:1, p.1-9. https://doi.org/10.1002/jemt.20396 or https://biochimie.umontreal.ca/wp-content/uploads/sites/37/2012/08/Thiodiethanol-new-water-mounting-media-2007.pdf
-
This paper introduces 2,2'-TDE and has some good illustrations on why it – and refractive index matching in general – is useful. In effect, it helps show why the additional steps of using 2,2'-TDE (as in Holt & Savoian, 2017) are worthwhile compared to the simpler approach of Perry et al. (2017).
-
-
Diel, E., Lichtman, J., Richardson, D. (2020) Tutorial: avoiding and correcting sample-induced spherical aberration artifacts in 3D fluorescence microscopy. Nature Protocols, 15(9), p.2773-2784. https://doi.org/10.1038/s41596-020-0360-2 or http://www.microscopist.co.uk/wp-content/uploads/2021/02/Tutorial-spherical-aberration.pdf
-
This is a useful and detailed introduction to the problems caused by refractive index mismatch.
-